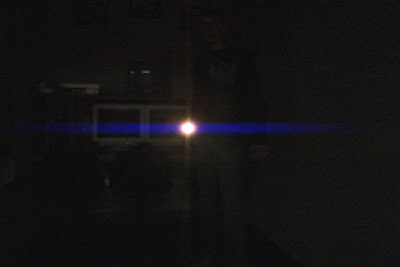
 Happy New Year to everyone! Sorry I'm a bit late on this, but so it goes... This is a follow–up on the Lens–Flare promise. As you know, it only uses the effects that are native to After Effects. In fact it only uses one effect: Glow.
 This will work wonders for you if you want to just add a little more style on a certain shot for a client. Here's how:
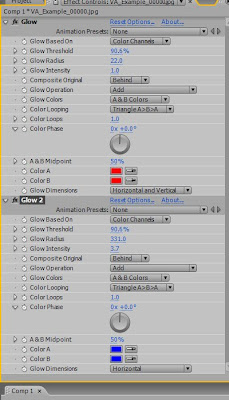
1. After you have your comp ready, create a new adjustment layer (not necessary, but recomended). Apply Effect, Stylize, Glow. Duplicate the glow and turn off the second instance.
2. You need to create the core. Set the A and B colors both to a nice red color of your choosing. Change the Glow Colors to A & B Colors (the color looping doesn't matter since they're the same colors). Change the glow threshold to something very high (you'll have to eyeball this for your shot, every image will be different), usually the 80's or 90's does the trick. Change the Glow Radius to what ever looks good for a core; you'll find that somewhere around 20 works most of the time. Lastly you can change the Glow Intensity to whatever you desire.
3. Now we create the blue horizontal streaks. Turn on the second instance of Glow and change both of the red colors to blue (or any other color if you want). Here's the key: change the Glow Dimensions from "Horizontal and Vertical" to "Horizontal" only. Change the radius to someting very high, until it flares across the screen. Lastly bring up or down the glow intensity. Voilà!
4. If you used the adjustment layer, you can change the opacity of that to further sell the effect. RAM preview and you'll see that with no keyframes the glow will automatically follow the highlights and turn off (sort of) when there should be no flare.

Obviously this isn't perfect and shouldn't be substituted for the real thing. Not all highlights would create a flare, the shape and colors aren't entirely correct, etc... But for five minutes of work and no extra money spent, this is great. As you know from the original comparison, this technique can work better that some plugins that do it automatically for you. It's all a matter of adjusting the colors, the radius, the intensity, etc to come up with what looks good to you.
Hope you enjoy this!

13 comments:
AWESOME THANKS!!
sweet man as usual thanks so much
great technique. what was the plugin u used for the other one?
thanks a lot. it was realy helpful.
awesome dude thanks again
Sweet tutorial man! Keep up the good work!
Happy New Year to you too! Thanks for the tutorial!
happy holidays bro. appreciate the tuts
sweet man you rock!
awesome dude thanks for the tut!
Much appreciated mate, thankyou.
I been looking for this hollywood effect for ages, this is the ONE
Hey man tell me from where you get such creative ideas?? I am just been your fan. Simply fabulous work buddy...
Hello friend!
I want to do an adaptation of a film to Portuguese ...
This is the original: http://www.youtube.com/watch?v=5WCTltHR-Hg
I intend to make a similar one using the green screen - or I have to find a real hole! :)
Could you give me some tips for shooting/filming?
Scenes from the bottom can be filmed anywhere ... but how can I make the scenes where a character appears at the top of the hole and the other fallen there? Or the scenes where you see someone up there? Or the scenes where the camera rises up?
Any idea? Tutorial?
Thanks
Post a Comment