Video Apex Bookshelf

Showing posts with label Visual Effects. Show all posts

Friday, January 9, 2009

Anamorphic Lens–Flare Creation

Happy New Year to everyone! Sorry I'm a bit late on this, but so it goes... This is a follow–up on the Lens–Flare promise. As you know, it only uses the effects that are native to After Effects. In fact it only uses one effect: Glow.

This will work wonders for you if you want to just add a little more style on a certain shot for a client. Here's how:

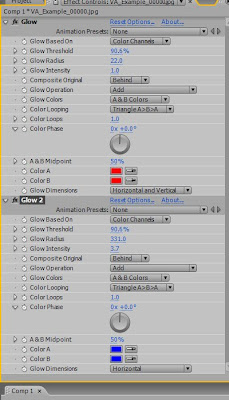
1. After you have your comp ready, create a new adjustment layer (not necessary, but recomended). Apply Effect, Stylize, Glow. Duplicate the glow and turn off the second instance.

2. You need to create the core. Set the A and B colors both to a nice red color of your choosing. Change the Glow Colors to A & B Colors (the color looping doesn't matter since they're the same colors). Change the glow threshold to something very high (you'll have to eyeball this for your shot, every image will be different), usually the 80's or 90's does the trick. Change the Glow Radius to what ever looks good for a core; you'll find that somewhere around 20 works most of the time. Lastly you can change the Glow Intensity to whatever you desire.

3. Now we create the blue horizontal streaks. Turn on the second instance of Glow and change both of the red colors to blue (or any other color if you want). Here's the key: change the Glow Dimensions from "Horizontal and Vertical" to "Horizontal" only. Change the radius to someting very high, until it flares across the screen. Lastly bring up or down the glow intensity. VoilĂ !

4. If you used the adjustment layer, you can change the opacity of that to further sell the effect. RAM preview and you'll see that with no keyframes the glow will automatically follow the highlights and turn off (sort of) when there should be no flare.
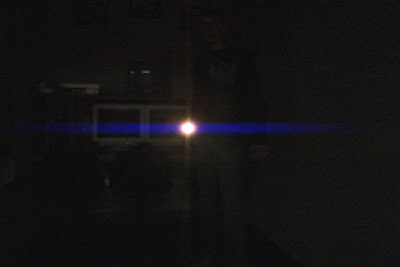
Obviously this isn't perfect and shouldn't be substituted for the real thing. Not all highlights would create a flare, the shape and colors aren't entirely correct, etc... But for five minutes of work and no extra money spent, this is great. As you know from the original comparison, this technique can work better that some plugins that do it automatically for you. It's all a matter of adjusting the colors, the radius, the intensity, etc to come up with what looks good to you.

Hope you enjoy this!

Friday, December 5, 2008

Anamorphic Lens–Flares

It's amazing how little things can add a big difference to video when you're trying to make it look like film. Anything from color correction to proper shadows to lens flares can help.

Lately I've been playing around with ways to create lens flares in After Effects without using plug-ins or generators. I've used everything from solids to the glow plugin to motion tracking, etc. Here are two examples: one was created with a very popular plugin, and the other was created in after effects without any plugins; see if you can guess which is which:

Notice how only the top one has a core, the bottom one does not...the top is the one that I created in After Effects, the other was made using another popular plug-in. For three minutes of work it looks very good. What you can't tell by the pictures though, is that the top one has much more smooth movement than does the bottom when it's applied to video.

There may be a how-to post or maybe even a tutorial that deals with this sort of thing in the near future. Let me know what you guys think!

Saturday, September 6, 2008

Hace Sol

Alright, so many times when I've worked on a project it seems that there could always be some way to take the extra step to push the realism and excitement. So I came up with a nice way of creating a sun, and here's how it goes:

Start out by creating a new solid that is a sort of yellow/orange color like this:

Now select the oval mask shape tool, and while you drag you may choose to hold down shift to confine it to the shape of a circle. This is the basis for our sun. Next, apply a simple fast blur to around one to five pixels, depending on the resolution of the video behind it. Duplicate the layer twice. With the first duplicate, turn the blur amount to to about 50 pixels, and set the third one to anywhere between 150 and 200 pixels, judging which looks best. Now you can set the core of the sun to the screen transfer mode (the layer with the one-pixel blur), and the other two to the add transfer mode. And this is what we get:Of course you would want to motion track the sun into the sky, and set the anchor point to be the center of the sun, using the pan behind tool.

Now it looks better, but we can do something else, and that's a lens flare. Now after effects is quite limited in it's ability to create lens flares, since it only has three presets, so you may find yourself buying a plug-in eventually, such as Knoll Light Factory.

But if you opt to use the After Effects lens flare effect, create a new black solid, apply the lens flare effect (Effect-->Generate-->Lens Flare), adjust the settings to your preference, and set the layer to screen, not add (it ends up being way to bright, and blows out many parts of the flare). Be sure to paste the tracking data from the sun to the Flare Center. I always bring the opacity of the flare layer down as well.

After you've done all that, we have this:

Lastly, you can perform your color correction, and end up with something like this:
It's a very subtle effect, but realistic compositing and grading is all about the little details.

Note: You want to set the black and white points after adding the sun, but before the lens flare, as well as the gradients and vignettes. All of this was demonstrated in my tutorial, Creating Digital Cinema.

Wednesday, July 2, 2008

New Reel

In the past we (Video Apex) have only worked on effects shots, motion graphics, etc... for private companies and as such are not allowed to place any material we work on in a demo reel. We are now trying to move beyond this and are striving to assemble a new, professional reel that will demonstrate our team's great talent and ability.

For the next few months we will be accepting compositing, titling, color grading, and effects jobs from clients world-wide. Since we are doing this project for the sole purpose of creating and enhancing the reel, all jobs that we choose to take will be be accepted for under $100, which will cover operational expenses.

We have a system in place that will allow us to work with clients worldwide, so please do not consider distance to be an obstacle. Everything submitted to us will be considered.

If interested please contact me at alecschwandt@gmail.com.

Thank-you!

Alec Schwandt
Marketing Director
Video Apex

Monday, May 26, 2008

Sin City Effect Part 2

It's finally here!In this video tutorial, Creative Cow contributing editor Grant Swanson will cover important and useful techniques for working with alpha channels that are specifically derived from certain color luminance values. He will explain how to extract the color of a certain area of the image, turn it into an alpha channel, and use it to manipulate the image.

This has been a while in the making. I've tried several different techniques for this, and finally I came across what I teach in the tutorial. I hope it satisfies those of you who have been anxiously waiting for a part 2!

Don't forget to stay tuned for the next tutorial - improving your DV (especially SDDV) footage!

Wednesday, April 23, 2008

Sin City Effect & Mystic Text

Since this blog started after the release of these two tutorials, I'll just combine them into one post. Feel free to leave comments on your thoughts, or any questions you may have.

Sin City
In this video tutorial, Creative Cow contributing editor Grant Swanson will take you step-by-step through the easiest and fastest (and extremely effective) way of creating the popular Sin City effect - colorized objects in a black and white world. You will learn basic techniques when working with color, and some useful masking/rotoscoping techniques.

Mystic Text
In this video tutorial, Creative Cow contributing editor Grant Swanson will take you through an effective way of tracking "Mystic Text" onto a wall or screen. This technique can be used in horror films, commercials, or promos. He will cover the basics of the After Effects paint tools, some basic "2.5D" motion tracking, and some simple yet effective compositing techniques.

UPDATE:
I was planning to mention this, but forgot to in the tutorial.

Another, and perhaps simpler option to recording the paint strokes, is to use the "write-on" selection for the "Duration" property in the Paint menu, rather than "Constant". This is especially useful if you have a Wacom tablet, since it will record your exact motion and timing.

The only downside is that it is difficult to edit should you make a mistake, whereas with the technique I demonstrated, you have complete control.